안녕하세요 땜블리 입니다.
아두이노와 베이직 트레이닝 보드를 이용한 OLED 제어 실습을 진행 하겠습니다.
베이직 트레이닝 보드는 아래에서 확인이 가능합니다.
라즈베리파이 피코 베이직 트레이닝보드 구성
라즈베리파이 피코 보드의 펌웨어실습을 위한 베이직 트레이닝보드를 소개 합니다. 현재 네이버 스마트스토어에서 판매가 진행되고 있습니다. 라즈베리파이 피코 베이직 트레이닝 보드 라즈베
ttcw.tistory.com
1) OLED 제어 구동 원리
(1) 동작설명

OLED(유기 발광 다이오드)는 유기 화합물 층으로 이루어진 LED 반도체 소자 중 하나입니다.
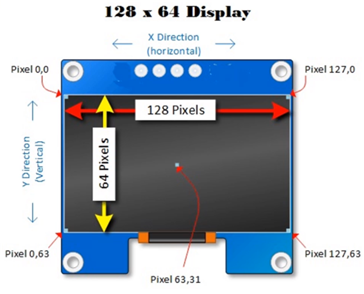
128x64 OLED 디스플레이는 단순한 도트 매트릭스 그래픽 디스플레이입니다.
128 개의 열과 64 개의 행이있어 총 128x64 = 8192 픽셀을 표시합니다.
이 픽셀의 LED를 켜고 끄면 모든 모양의 그래픽 이미지를 표시 할 수 있습니다.
LED는 금속 재료를 사용하지만 OLED는 유기 재료를 사용하여 가볍고 자체적으로 발광하여 백라이트도 없어 얇은것이 특징입니다.

(2) 연결방법

연결 표

소스 코드
사용한 라이브러리
#include <U8g2lib.h>

(3) 코드작성
#include<Arduino.h>
#include<U8g2lib.h>
#ifdef U8X8_HAVE_HW_SPI
#include<SPI.h>
#endif
#ifdef U8X8_HAVE_HW_I2C
#include<Wire.h>
#endif
U8G2_SSD1306_128X64_NONAME_1_HW_I2C u8g2(U8G2_R0, /* reset=*/ U8X8_PIN_NONE);
#define U8LOG_WIDTH 20
#define U8LOG_HEIGHT 8
uint8_t u8log_buffer[U8LOG_WIDTH*U8LOG_HEIGHT];
U8G2LOG u8g2log;
void setup() {
  // put your setup code here, to run once:
Serial.begin (115200);
  u8g2.begin();
  u8g2.setFont(u8g2_font_5x7_tr); // set the font for the terminal window
  u8g2log.begin(u8g2, U8LOG_WIDTH, U8LOG_HEIGHT, u8log_buffer);
  u8g2log.setLineHeightOffset(0); // set extra space between lines in pixel, this can be negative
  u8g2log.setRedrawMode(1);   // 0: Update screen with newline, 1: Update screen for every char
}
void loop() {
  // put your main code here, to run repeatedly:
  char c;
  while (Serial.available() >0) {
    c =Serial.read();     // read from Serial Monitor
    u8g2log.print(c);               // print to display
    Serial.print(c);                // and print back to monitor
  }
}
(4) 동작결과
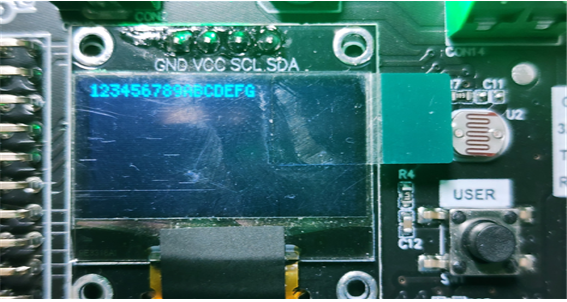
시리얼 창에 123456789ABCDEFG를 입력하면 아래와 같이 출력 됩니다.


2) OLED에 현재 온도/습도, CdS/가변저항 데이터 출력 제어
(1) 동작설명
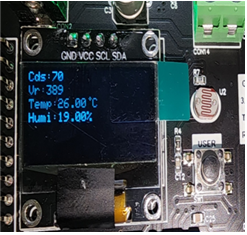
앞서 DH11을 이용하여 온도와 습도센서, CDS 사용 코드에 OLED 출력 부분을 추가 해주면 됩니다.
(2) 연결방법

연결표

(3) 코드작성
#include"DHT.h"
#define DHTPIN 4
#define DHTTYPE DHT11   // DHT 11
constint CDSPIN = A2;
int CDS_Value =0;
constint VRPIN = A3;
int Vr_Value =0;
#include<Wire.h>
#include<Adafruit_GFX.h>
#include<Adafruit_SSD1306.h>
DHT dht(DHTPIN, DHTTYPE);
#define SCREEN_WIDTH 128
#define SCREEN_HEIGHT 64
Adafruit_SSD1306 display(SCREEN_WIDTH, SCREEN_HEIGHT, &Wire, -1);
voidsetup() {
  Serial.begin(115200);
  Serial.println(F("OLED 2!"));
  pinMode(CDSPIN, INPUT);
  pinMode(VRPIN, INPUT);
  dht.begin();
  display.begin(SSD1306_SWITCHCAPVCC, 0x3C);
  display.clearDisplay();
  display.setTextSize(1);
  display.setTextColor(WHITE);
}
voidloop() {
  delay(2000);
  float h = dht.readHumidity();
  float t = dht.readTemperature();
  if (isnan(h) || isnan(t)) {
    Serial.println(F("Failed to read from DHT sensor!"));
    return;
  }
  CDS_Value =analogRead(CDSPIN);
  Serial.print("CDS_Value: ");
  Serial.print(CDS_Value);
  Vr_Value =analogRead(VRPIN);
  Serial.print("  VrValue = ");
  Serial.print(Vr_Value);
  Serial.print(F("  Humidity: "));
  Serial.print(h);
  Serial.print(F("%  Temperature: "));
  Serial.print(t);
  Serial.println(F(" °C "));

  display.clearDisplay();
  display.setCursor(0, 0);
  display.print("Cds:");
  display.print(CDS_Value);
   display.setCursor(0, 10);
  display.print("Vr:");
  display.print(Vr_Value);
  display.setCursor(0, 20);
  display.print("Temp:");
  display.print(t);
  display.drawCircle(63, 20, 1, WHITE);
  display.print(" C");
  display.setCursor(0, 30);
  display.print("Humi:");
  display.print(h);
  display.print("%");
  display.display();
}
(4) 동작결과


'아두이노 > 아두이노 IDE' 카테고리의 다른 글
| 12. 아두이노 IDE 블루투스 [베이직 트레이닝 보드] (0) | 2023.03.10 |
|---|---|
| 11. 아두이노 IDE SD카드제어 [베이직 트레이닝 보드] (0) | 2023.03.09 |
| 09. 아두이노 IDE DHT11제어 [베이직 트레이닝 보드] (0) | 2023.03.07 |
| 08. 아두이노 IDE 릴레이제어 [베이직 트레이닝 보드] (0) | 2023.03.06 |
| 07. 아두이노 IDE WS2812 풀컬러LED 제어 [베이직 트레이닝 보드] (0) | 2023.03.05 |


댓글