728x90
반응형
안녕하세요 땜블리 입니다.
아두이노와 베이직 트레이닝 보드를 이용한 스위치 제어 실습을 진행 하겠습니다.
베이직 트레이닝 보드는 아래에서 확인이 가능합니다.
라즈베리파이 피코 베이직 트레이닝보드 구성
라즈베리파이 피코 보드의 펌웨어실습을 위한 베이직 트레이닝보드를 소개 합니다. 현재 네이버 스마트스토어에서 판매가 진행되고 있습니다. 라즈베리파이 피코 베이직 트레이닝 보드 라즈베
ttcw.tistory.com
1) 스위치제어 구동 원리
(1) 동작설명
A, D 접점은 연결 되어있지만 Nomal 상태에서 A, D와 B, C 접점은 연결되어있지 않습니다.
버튼이 눌리는 순간 A, D접점과 B, C접점이 연결 됩니다.


(2) 연결 방법

연결 표

(3) 코드작성
int BUTTONPIN =9;

void setup()
{
  Serial.begin(115200);
  pinMode(BUTTONPIN,INPUT_PULLUP); // 플로팅을 방지하기 위한 풀업 세팅
}
void loop()
{
  if (digitalRead(BUTTONPIN)==LOW)
  {
   Serial.println(“Push”);
  }
}
(4) 동작결과

2) 스위치를 이용한 LED 제어 (채터링 방지 방법)
(1) 동작설명
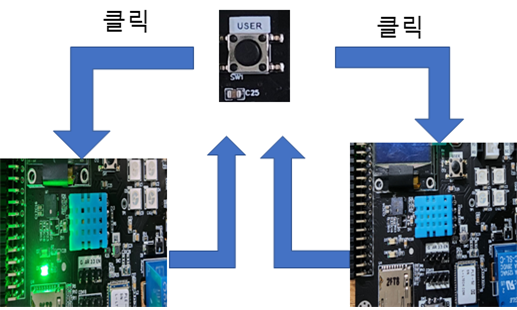
버튼이 눌러지는 것을 아두이노가 체크하여 눌렸을 경우 LED를 제어 하여 킵니다.
버튼이 눌리지 않았을 때 LED를 끕니다.
스위치를 짧게 한번 눌렀다 때면, 스위치의 물리적 떨림에 의해 스위치가 여러 번 눌러진 것과 같은 현상을 채터링이라고 합니다. 이를 방지하는 프로그램입니다.

반응형
(2) 연결방법

연결 표

(3) 코드작성
const int BUTTONPIN =9;
const int LEDPIN =5;
int buttonState;
int ledState = HIGH;
int lastButtonState = LOW;
unsigned long lastDebounceTime =0;
unsigned long debounceDelay =50;

void setup()
{
   Serial.begin(115200);
   pinMode(BUTTONPIN, INPUT);
   pinMode(LEDPIN, OUTPUT);
   digitalWrite(LEDPIN, ledState);
}
void loop()
{
int reading =digitalRead(BUTTONPIN);
if (reading != lastButtonState) {
    // reset the debouncing timer
    lastDebounceTime = millis();
  }
if ((millis() - lastDebounceTime) > debounceDelay) {
    // whatever the reading is at, it's been there for longer than the debounce
    // delay, so take it as the actual current state:
    // if the button state has changed:
    if (reading != buttonState) {
      buttonState = reading;
      // only toggle the LED if the new button state is HIGH
      if (buttonState == HIGH) {
        ledState =!ledState;
      }
    }
  }
  // set the LED:
  digitalWrite(LEDPIN, ledState);
  // save the reading. Next time through the loop, it'll be the lastButtonState:
  lastButtonState = reading;
}
(4) 동작결과
버튼을 누를 때 마타 led의 상태가 ON 0FF 변경 됩니다.

728x90
반응형
'아두이노 > 아두이노 IDE' 카테고리의 다른 글
| 06. 아두이노 IDE PWM 제어 [베이직 트레이닝 보드] (0) | 2023.03.04 |
|---|---|
| 05. 아두이노 IDE ADC제어[베이직 트레이닝 보드] (0) | 2023.03.03 |
| 04. 아두이노 IDE 부저제어[베이직 트레이닝 보드] (0) | 2023.03.02 |
| 02. 아두이노 IDE LED 제어 실습[베이직 트레이닝 보드] (0) | 2023.02.28 |
| 01. 아두이노 IDE 개발환경 구축 (0) | 2023.02.28 |


댓글